
Effective Ways to Soundproof Your Basement Media Room
Transforming your basement into a media room can offer an immersive entertainment experience unlike any other area of your home. With fewer windows and lower foot traffic, basements are naturally designed to provide a feeling of seclusion—perfect for movie nights, gaming marathons, or listening to music at a higher volume. However, even the coziest basement can have challenges when it comes to soundproofing. The concrete walls, open ceiling joists, and exposed plumbing so often found in below-grade spaces can cause sound to travel easily or reverberate. Fortunately, there are numerous proven strategies to ensure your new media hub stays quiet for the rest of the household—and for neighbors—while still accurately delivering crisp, powerful audio.
Why Basements Need Special Consideration for Soundproofing
Though basements enjoy a slight advantage in containment compared to upper-level rooms, a surprising amount of noise can leak out if your renovation doesn’t account for proper sound isolation. Typical basement foundations are made of hard, dense materials like poured concrete or cinder blocks. While these materials help form sturdy walls, they can also transmit structural vibrations. Additionally, any uninsulated or unsealed spaces around piping, ductwork, and electrical wiring serve as sneaky pathways for noise escape or entry. Warm air ducts, for instance, often amplify sound if left unrevised.
Given that many basements also double as multi-purpose rooms—such as home offices, playrooms, or even guest suites—proper soundproofing is essential not only for your personal enjoyment, but also for the comfort of everyone else within earshot. Whether you’re watching the latest blockbuster film or hosting a watch party for your favorite sports team, investing in comprehensive soundproofing measures ensures you can tune in without disturbing others. Better yet, it can allow those in other parts of the house to go about their day or get restful sleep, unaffected by the cinematic action unfolding underground.
Structural Soundproofing Techniques
A solid frame is the best defense against sound transmission. Basement walls typically abut the home’s foundation, so to reduce noise, you’ll want to create a structure that decouples or isolates the interior walls from the concrete. One approach is building a double-stud or staggered-stud wall system. These systems minimize the direct contact points where vibrations can travel from sheetrock to the framing and ultimately to the foundation.
For added effectiveness, fill these walls with high-density insulation. Common products include mineral wool or dense fiberglass specifically rated for sound absorption. If you’re curious about insulation options that might perform double duty—soundproofing and improving energy efficiency—one helpful resource to explore is What type of insulation works best for basement walls?. There, you’ll learn more about the benefits and potential trade-offs of each material, so you can make an informed decision.
Beyond the walls, consider the ceiling. It’s often easy to overlook overhead space, but sound easily travels upward through floor joists. Installing resilient channels or sound isolation clips can help. These devices act like shock absorbers between the ceiling drywall and joists, preventing impact noises (like footsteps or dropped objects) from becoming disruptive. It’s also essential to pack ceiling cavities with insulation to ensure full coverage. When you isolate the ceiling plus add robust insulation, you’re effectively creating a barrier that dampens or absorbs unwanted sound waves before they can spread to the rooms above.
Managing Impact Noise and Vibrations
Impact noise originates when an object physically touches your structure—footsteps on the floor above, furniture being moved around, or even a subwoofer pounding in your media room. Stopping these vibrations at the source, or at least preventing them from traveling throughout the entire home, can be one of the trickier aspects of basement soundproofing. By using a floating floor system, you can add another layer of separation. These systems involve installing underlayment or padding directly beneath your flooring material—potentially with a layer of mass loaded vinyl (MLV) under it all. MLV is dense yet flexible, and it’s specifically designed to reduce vibration by adding extra mass.
Of course, certain types of flooring dampen impact noise better than others. If your basement is prone to moisture, you might consider materials that are resilient and resistant to mold. To learn more about flooring options that handle damp environments well, see What is the best type of flooring for a damp basement?. By combining the right flooring product with high-quality underlayment, you can achieve a meaningful reduction in noise transmission. If you’ve already got your heart set on using carpet or hardwood floors, a sound-insulating underlayment can still work wonders.
Adding Mass to Block Sound
One of the core principles in effective soundproofing is adding mass. More mass equates to more resistance to vibrations trying to pass through surfaces. That’s why layering drywall is a popular strategy. Incorporating two layers of thick drywall—especially when separated by a soundproofing compound like Green Glue—traps sound within the layers. The same logic applies to your doors. Solid-core doors, as opposed to hollow-core models, can yield a noticeable difference.
While mass alone doesn’t solve every soundproofing challenge, it’s a crucial component of a layered solution. Combine it with decoupling the framing (so vibrations transfer less), acoustic insulation, and sealants, and you have a well-rounded barrier that can handle different types of sound frequencies—from high-pitched dialogue to low-frequency bass notes.
Sealing Leaks and Hidden Gaps
Even the most substantial mass and best insulation can be undermined by minor breaches. Sound travels remarkably well through small gaps around outlets, lighting fixtures, plumbing penetrations, and doors. To counteract this, use acoustic sealants designed for these specific areas. Acoustic caulking remains flexible over time, meaning it won’t crack or pull away if your basement undergoes minor shifts. Thoroughly inspect your entire basement for openings: wiring holes in the studs, spaces around ductwork, or even the perimeter of the floor. Sealing these gaps is an easy but crucial step to achieving a truly sound-isolating environment.
Homeowners tackling a comprehensive basement remodel often ask, “Do I need permits and inspections for a basement remodel?” If you’re making structural changes, that query is answered over in another helpful resource: Do I need permits and inspections for a basement remodel?. Properly sealing up the framing and passing code requirements can go hand in hand when you address these details early in the project.
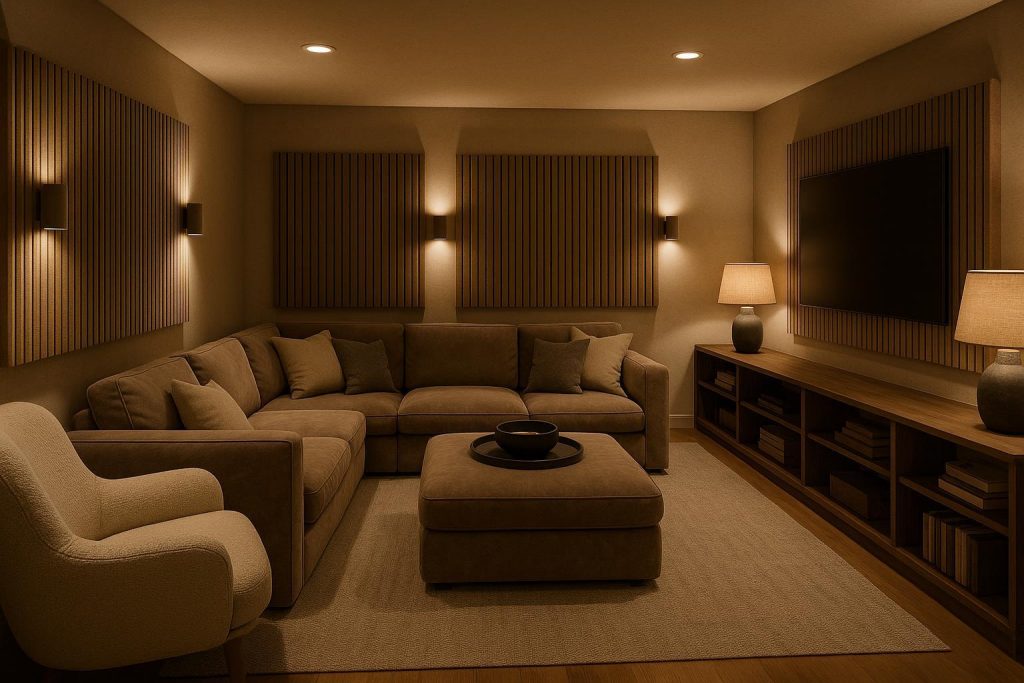
Interior Acoustics and Sound Absorption
Soundproofing focuses primarily on keeping noise contained within the space (or keeping external noise out). However, there’s another piece to the puzzle: optimizing the acoustics within your media room itself. Hard surfaces in a basement—like concrete, brick, and even smooth drywall—reflect sound waves, leading to echoes or poor clarity in your audio system. Adding soft, cushioned surfaces helps absorb these reflections.
Here’s where thick curtains, plush carpeting, and fabric wall panels can shine. Fabric wall panels, for instance, contain sound-absorbing materials and can be mounted around your room to reduce echo. Floor-to-ceiling drapes along the walls or in front of windows also absorb a great deal of sound energy. An upholstered sofa and thick area rugs can further contribute to a theater-like feel, soaking up excess sound while adding warmth.
Temperature Control and Moisture Management
Because basements tend to remain cooler and often more humid than the rest of the home, it’s wise to think about how climate control ties into your soundproofing plan. If your space has a history of humidity issues or minor leaks, consider researching best practices for basement waterproofing and insulation. If moisture and odors are a concern, you might find practical tips in How can I remove musty odors from a renovated basement?. While addressing these issues doesn’t directly relate to sound dampening, preventing mold growth or water intrusion ensures any acoustic materials you invest in (like insulation, carpets, or acoustic panels) aren’t compromised in the long run.
Additionally, properly insulated walls and ceilings not only block sound—but they also help maintain a stable temperature. Maintaining a comfortable humidity level and climate is important for electronics too, ensuring your audio and video equipment can operate without any damage caused by excess moisture. This synergy of thermal insulation and soundproofing can lead to a more pleasurable media experience overall and prevent your new entertainment zone from feeling stale or clammy.
Furniture Placement and Room Layout
Believe it or not, the way you arrange furniture can also influence the acoustics and perceived sound leakage. If possible, place your seating areas away from direct contact with walls where external noise can creep in. Use heavy bookcases filled with media or decorative items along exterior walls to add extra mass and reduce sound transmission. Additionally, it may help to position speakers or subwoofers in a way that channels sound more evenly around the space rather than bouncing against hard corners. Taking the time to do a speaker calibration or simply experimenting with placement can drastically improve your media room’s sound quality.
When planning your layout, be mindful of other basement design considerations—like how you’ll incorporate a bathroom, an exercise nook, or even a small bar area. If you’re curious whether adding a new bathroom is feasible in your basement space, be sure to check out Is it possible to add a bathroom during a basement renovation?. Multitasking from the start can help you coordinate everything, from plumbing to wiring, in a single, streamlined plan that reduces future disruptions to your newly soundproofed environment.
Final Touches and Long-Term Maintenance
Once your walls, floors, and ceilings are properly treated, devote attention to the smaller details that make the media room experience truly exceptional. Consider how lighting impacts the atmosphere—installing dimmers or recessed fixtures can minimize distractions without compromising on visibility. If your basement has any windows, a set of blackout curtains will help both block external light and contribute to sound absorption. Meanwhile, doors leading in and out of the room should have proper weatherstripping to further contain sound within the space.
After the construction phase, periodic checks ensure your soundproofing measures stand the test of time. This might involve examining seals for cracks or reapplying acoustic caulking if you notice any shrinkage around ducts or wiring. If you refresh your media room decor in the future, remember that swapping out plush rugs for hard flooring or removing acoustic panels could alter the room’s acoustics. Keep a log of the products and materials used so you can easily replace or upgrade items with suitable alternatives.
When to Seek Professional Help
If you’re unfamiliar with carpentry, electrical work, or advanced sound dampening methods, consulting a renovation professional can save you time—and help you avoid costly mistakes. At times, you might need to move or reinforce load-bearing elements or relocate plumbing and HVAC lines to accommodate your new acoustical design. Engaging an experienced contractor who’s well-acquainted with basement renovations can streamline those processes. Professionals can also advise you on crucial building codes, including situations in which you might need an egress window if you plan to use part of your basement as a legal suite or bedroom. Should that be on your radar, feel free to look into What egress window requirements apply to basement bedrooms?.
Working with a knowledgeable team doesn’t necessarily mean overspending. A good contractor understands the importance of balancing your budget with your vision for outstanding acoustics. By leveraging the correct materials, layering strategies, and an efficient workflow, you can end up with a tailored solution that fits your unique space. If you’d like to explore expert insights further, our Home page offers additional tips on basement transformations and what to expect when undertaking such a project.
Conclusion
Soundproofing a basement media room involves understanding—and tackling—multiple layers of noise transmission. From preventing structural vibrations to sealing hidden gaps, every step contributes to a cohesive, comfortable environment that allows you to fully immerse yourself in your favorite films, games, or music. Success hinges on a thoughtful approach, combining mass, decoupling, acoustic insulation, and sealing to form a robust barrier. Properly positioned furniture, sound-absorbing decor, and climate control round out the experience, making your basement media room as inviting as it is functional. By considering the larger context of your basement renovation—such as moisture concerns, potential code requirements, and future expansions—you can maximize your investment. With the right strategy and careful planning, you’ll have a media haven that feels truly private, delivering cinema-quality audio and comfort that everyone in the household can appreciate.